LMDE4 Custom Partitions for Disk Encryption
date: 2020-12-15
Introduction
Linux Mint Debian Edition is the alternate version of Linux Mint, but built on a Debian base. The result is quite pleasant: the stability of desktop Debian, but with the rough edges polished smooth, nicely configured fonts and ui, and all the multi-media codecs included.
Previously, I wrote a guide for installing LMDE3 with disk encryption. The installer for LMDE 4 is different in that it includes support for disk encryption, but not if you need custom partitions such as for a dual-boot configuration.
With this in mind, the examples presented below assume that you have Windows 10 installed in 4 partitions, and
thus you would want to make 3 partitions (5,6,7) after that, for LMDE4.
As with before, with separate partitions for /boot formatted ext4, /boot/efi formatted fat32,
and a regular luks-encrypted partition for / formatted xfs.
With a separate efi partition for LMDE4, you can then use the computer's device boot menu to select which efi boot entry you want to boot. There is also an advantage in having Windows use the first efi partition, in that if something happens to the Windows efi boot entry, you can fall back to the default efi executable. Whereas, if the efi boot entry for Linux somehow gets wiped, you could repair that easily enough via chroot.
Prepare The Installation Media
Visit the Linux Mint Website and download the iso file for LMDE 4 64bit. Download from torrents if possible, to save bandwidth.
- verify the sha256 sum of the iso file
sha256sum lmde-4-cinnamon-64bit.iso
Identify the thumb drive you are going to install from.
- type
lsblk, note the output, and then insert the thumb drive - then type
lsblkagain and note the additional output
# lsblk /dev/sdb
NAME MAJ:MIN RM SIZE RO TYPE MOUNTPOINT
sdb 8:32 1 14.5G 0 disk
├─sdb1 8:33 1 3.4G 0 part /media/trent/Debian 9.6.0 amd64
└─sdb2 8:34 1 416K 0 part
/dev/sdb, and partition /dev/sdb1 is automatically mounted.
Take special care that you have accurately identified the thumb drive before proceeding. For the sake of example,
we will proceed on the assumption that our thumb drive is identified as /dev/sdb, but you need to compensate accordingly.
-
unmount any partition of the thumb drive that are automatically mounted
umount /dev/sdb1 -
write the disk image to the thumb drive
ddrescue -D --force lmde-4-cinnamon-64bit.iso /dev/sdb
Boot The Install Disc
- boot into bios to disable fastboot and secureboot
- invoke your machine's device boot menu and boot the install disc in uefi mode
- confirm that you have booted in uefi mode by listing efivars
ls /sys/firmware/efi/vars
Partition The Hard Drive
If you recall we are assuming the target hard drive is /dev/sda, as an example. So, make adjustments as necessary.
If you would rather use a different partition tool, make sure the efi partition is an efi partition type, and you definitely need a separate /boot partition.
If indeed, you are installing a dual-boot and are installing alongside another operating system, then skip steps 1 and 2, obviously.
- if needed you can clear the drive with wipefs
wipefs --all /dev/sda - create a new partition table for
/dev/sdasgdisk /dev/sda -o - create a new efi partition for
/dev/sdasgdisk /dev/sda --new=5::+512MiB --typecode=1:ef00 - create a new
/bootpartition for/dev/sdasgdisk /dev/sda --new=6::+1G - create a new
/partition for/dev/sdasgdisk /dev/sda --new=7 - verify your partition work
sgdisk /dev/sda -p - format the efi partition
mkfs.vfat -F32 /dev/sda5 - format the /boot partition
mkfs.ext4 /dev/sda6 - encrypt the
/partition, you will be prompted for a passwordcryptsetup -y -v luksFormat --type luks2 /dev/sda7 - decrypt the
/partition, you will be prompted for a passwordcryptsetup open /dev/sda7 cryptroot - format the
/devicemkfs.xfs /dev/mapper/cryptroot
Mount The Hard Drive
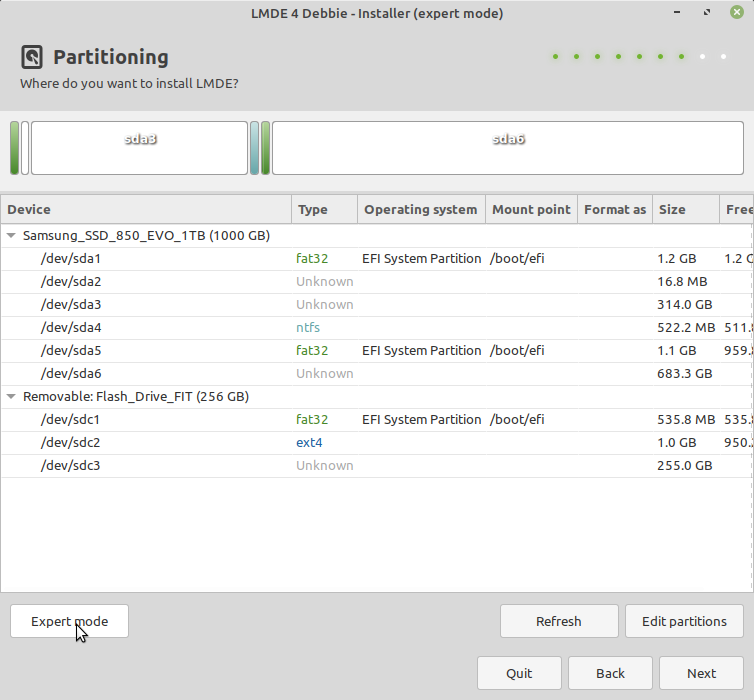
This takes advantage of expert mode in the LMDE installer.
- create an
/targetdirectorymkdir /target - mount the
/device at/targetmount /dev/mapper/cryptroot /target - create an
/target/bootdirectorymkdir /target/boot - mount the
/bootpartition at/target/bootmount /dev/sda6 /target/boot - create an
/target/boot/efidirectorymkdir /target/boot/efi - mount the efi partition at
/target/boot/efimount /dev/sda5 /target/boot/efi
Run The Installer App From Command Line
At this point you're ready to run the live installer. But you need to run the installer from the command line in order to use expert-mode:
live-installer --expert-mode
The first three pages of the live-installer cover Language,Timezone, and Keymap. The fourth page of the live-installer covers name, password, and hostname. After this select manual partitioning.
On the seventh page of the live-installer, you come to a partition configuration page.
But there is nothing to do here. The partition-configuration doesn't even recognize
your encrypted partitions. But no matter, because you have already mounted the target
file system relative to /target/, so select expert mode at the bottom of the page.
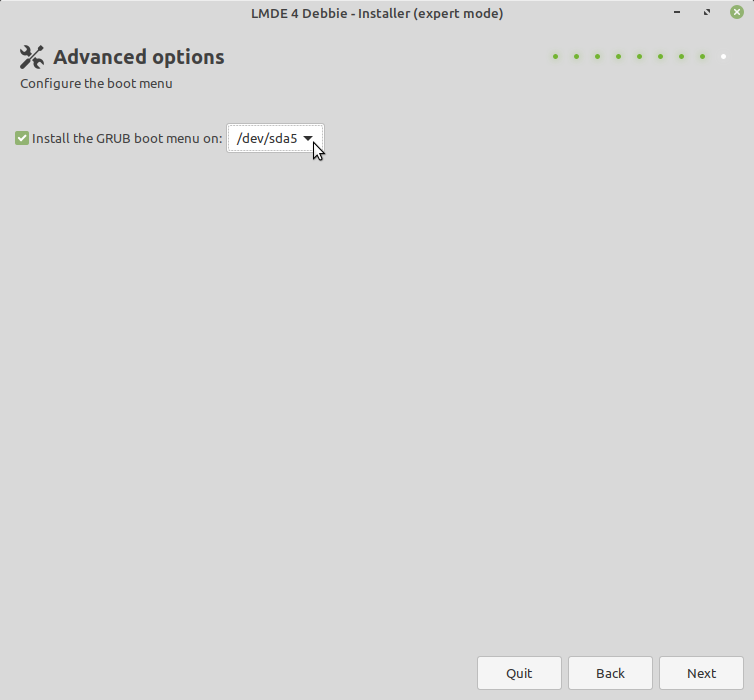
Again select forward, and when you come to the page where you configure the location
to install grub, that should be the efi partition, i.e. /dev/sda5.
Then continue with the installation. The installation will run for a
few minutes and will then pause. There will be a popup informing you that the installation has paused.
During the pause you need to manually configure fstab and crypttab.
Configure Fstab
- find the UUID of the efi partition
blkid /dev/sda5 -s UUID - find the UUID of the
/bootpartitionblkid /dev/sda6 -s UUID - find the UUID of the
/deviceblkid /dev/mapper/cryptroot -s UUID
And when you find the correct UUID numbers, use them to configure /etc/fstab which is actually currently at /target/etc/fstab.
# /etc/fstab
###############
# efi partition
# run the command `blkid /dev/sda1 -s UUID` which outputs
# /dev/sda5: UUID="17C4-215D", from which derive
UUID=17C4-215D /boot/efi vfat defaults 0 2

# /boot partition
# run the command `blkid /dev/sda2 -s UUID` which outputs
# /dev/sda6: UUID="f2509fff-4854-4721-b546-0274c89e6aec", from which derive
UUID=f2509fff-4854-4721-b546-0274c89e6aec /boot ext4 defaults 0 2

# "/" device
# run the command `blkid /dev/mapper/cryptroot -s UUID` which outputs
# /dev/mapper/cryptroot: UUID="72241377-cd65-43a6-8363-1afce5bd93f6", from which derive
UUID=72241377-cd65-43a6-8363-1afce5bd93f6 / xfs defaults 0 1
Configure Crypttab
But before the file systems can be mounted, crypttab needs to mount /dev/sda3 at /dev/mapper/cryptroot.
Configure /etc/crypttab which is actually currently at /target/etc/crypttab
Sorry, that's actually an over-simplification. But you need to configure crypttab now,
because when the installer continues running again, it installs the bootloader and builds the initramfs,
and mkinitramfs parses crypttab, and builds and configures the initramfs in such a way that it knows
to decrypt your / partition so it can then hand it off to the kernel at boot time (I think).
- find the UUID of the partition that will be mounted at
/dev/mapper/crypttabblkid /dev/sda3 -s UUID
And when you find the correct UUID number for /dev/sda3,
use that to configure /etc/crypttab which is actually currently at /target/etc/crypttab.
# /etc/crypttab
# run the command `blkid /dev/sda7 -s UUID` which outputs
# /dev/sda7: UUID="da3e0967-711f-4159-85ac-7d5743a75201", from which derive
# <target name> <source device> <key file> <options>
cryptroot UUID=da3e0967-711f-4159-85ac-7d5743a75201 none luks
Resume Installer App
At this point finish running the live installer, and you'll be done.
UEFI Fix
Well, actually there isn't one. In this scenario having two efi partitions, we rely on the motherboard correctly persisting efi boot entries.
So if you are unlucky enough to have one of the HP laptops that forgets efi boot entries, I guess you are out of luck.
You might try using a single efi partition instead of two, and maybe that will work. Presumably this would require using VeraCrypt for Windows, instead of Bitlocker (because Bitlocker won't allow Grub to load the Windows bootloader?)
Optional Swap File
Visit the Arch Wiki and they will hook you up.